Use the Flow Builder to create your Approvals.
Open the Flow Builder by going to: Manage > Approvals > name > View > Edit.
Now let's see how to add and modify each of the different steps types.
Triggers
Every approval needs at least one trigger. When you create a new approval or use a template, a trigger is usually added automatically. At minimum, you'll have a trigger Placeholder to choose the type of trigger from the Add Trigger dialog. As one trigger is always required, you cannot remove the final trigger Placeholder.
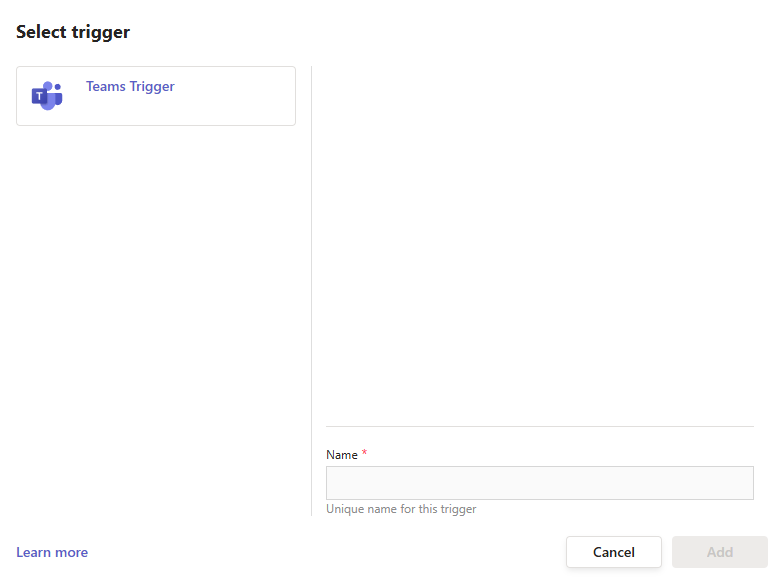
Add a trigger
If there's a Placeholder, click the + Add Trigger button on the Placeholder.

This opens the Select trigger dialog where you can choose the trigger type.
Replace a trigger
To replace a trigger, select Clear from the ... menu on the trigger.

This will remove the Trigger but keep the Placeholder. Then, just add your new Trigger as described above.
If you replace a Trigger and it's data is used in later steps, its data will no longer be available. This will cause errors when you Check and Finalise your approval, which you'll need to fix.
Add another trigger
To add a second trigger to an approval, click the ... menu on the Start step and select Add above.
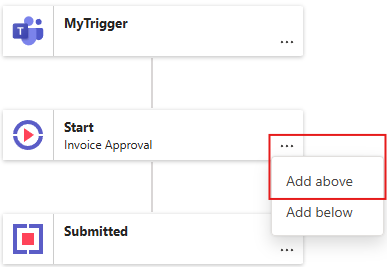
This will create a new trigger Placeholder.

Then, just add your new Trigger as described above.
Remove a trigger
To remove the Trigger but keep the Placeholder, click Clear. To remove both the Trigger and the Placeholder, click Remove. If it is the last Trigger, you can only click Clear because you can't remove the last Trigger Placeholder.
If you remove a Trigger and it's data is used in later steps, its data will no longer be available. This will cause errors when you Check and Finalise your approval, which you'll need to fix. If you intend to remove it, that's okay.
If you accidentally removed the Trigger, you can hit Undo to restore it.
Steps
This section explains how to add and manage both Control and Activity steps.
Add step
Before adding a new Step, make sure there is a Placeholder in the spot where you want the step to go. If not, create one by selecting the step above or below the desired location.
- If you select the step above, choose Add below
- If you select the step below, choose Add above


Next, click the + Add button on the Placeholder to open the Select step dialog. Select either Control or Activity, and then choose the specific step type from the list.

Remove step
To delete a Step but keep its Placeholder, select ... on the step and choose Clear.
To delete both the Step and its Placeholder, choose Remove.

If the Step’s data is used in later steps, removing it will cause errors when you Check and Finalise your approval. You will need to fix those errors before continuing.
If you remove a Step by mistake, you can select Undo to restore it.
Replace step
To replace a Step select ... on the step and choose Clear. This will remove the step but keep its Placeholder. Then, just add your new Step as described above.
If the Step’s data is used in later steps, replacing it will cause errors when you Check and Finalise your approval. You will need to fix those errors before continuing.
If you replace a Step by mistake, you can select Undo to restore it.
Move step
Before moving a Step, make sure there is a Placeholder where you want to move it. Then click ... on the Step and choose Select.

Any available Placeholders will show a Move button.
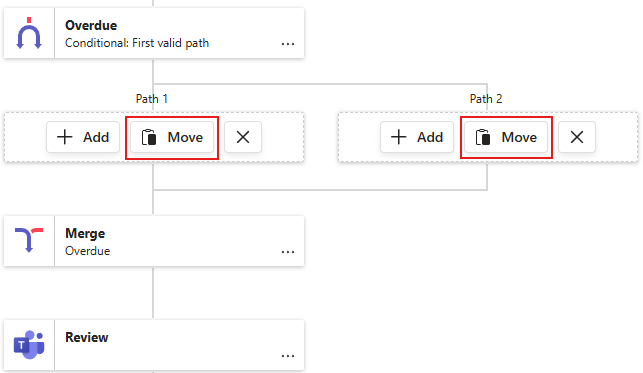
Click Move on the Placeholder where you want the Step to go. The Step will be moved to that location.
If later Steps rely on information from the Step you moved, you may see errors when you Check and Finalise your approval. You must resolve those errors before continuing.
If you move a Step by accident, click Undo to put it back.